Hi there! If you were following this blog last year, you might have wondered what was happening with the game since May 2019 (or just forgotten about it altogether!).
Well, the truth is that I got a full-time day-job here in the UK on 3rd June and no longer had any time to work on Quantum Rift. Wanting to perform my new role as best I could, even spare time that might have gone on game development was put into anything I thought might help me deliver for my employer. That effectively put this project on hold, aside from more artwork being completed in the background by Lukasz (the other more-talented half of the QR team), in his spare time outside his own day-job.
However, while time was stolen from the project, the day-job has at least solved the financial aspect of creating the first print-and-play iteration of this game (and supporting my family) and it’s why I can be here now telling you about the bright future ahead!
Working on the game without any other income and having to live off savings to support a family of five just wasn’t sustainable, and it really limited how much I could invest in the resources and research that were needed to make Quantum Rift the best it can be.
Having said that, without those six months of living very frugally and focusing most of my time on the development of this game, then it would have had no future either. In other words, it’s all good and the path to Quantum Rift’s print and play launch is clear.
Speaking of which …
What you can see above is a preview of the first page of 9 cards from our print-and-play variant of the game. (Click here for the full 44MB PDF.)
Over the next couple of months, we will be finalising all cards and rules so that we run a Kickstarter for Chapter 1 of the first Quantum Rift Adventure.
In the mean time, I will resume making the blog posts that explore more of the rules and other interesting aspects of the game. See you soon!
Units within the Quantum Rift Adventure Card Game can either be ready, exhausted or damaged at any one time. We show exhausted with a blue counter, damaged with a red counter and ready (the default state) without either counter, as in the photo below.
Units enter play in the ready state. When a ready unit attacks or an effect exhausts a ready unit, it changes to the exhausted state. When an effect damages a ready unit (or exhausted unit), it changes to the damaged state.
Units that are exhausted remain in this state until they are either readied (back to the ready state), which happens at the start of every turn, or an effect damages them to put them in the damaged state. Note: An exhausted unit can’t attack or exhaust again.
Units that are damaged remain in this state until they are either revived (back to the exhausted state) or an effect attempts to damage them again, which causes them to be destroyed (or lose 1 vitality if the unit has vitality). Note: A damaged unit can’t attack, can’t be readied and can’t exhaust.
Hopefully, it’s clear that becoming exhausted is not usually a problem because that only lasts until the start of the next turn, while becoming damaged is something to avoid unless you have some revival tricks up your sleeve (or in your hand). But, either way, if you are not ready when you get your chance to attack then you won’t be able to. Speaking of which, let’s look at the phases of the turn and see where this chance to attack might come.
Each of your turns playing the Quantum Rift Adventure Card Game proceeds through five phases after the start of turn, when exhausted units become ready again:
DEPLOYMENT
COMBAT (when ready units can attack, in order decided by player)
EXPLORE
THREAT (when THREAT effects are triggered)
REGROUP (when REGROUP effects are triggered)
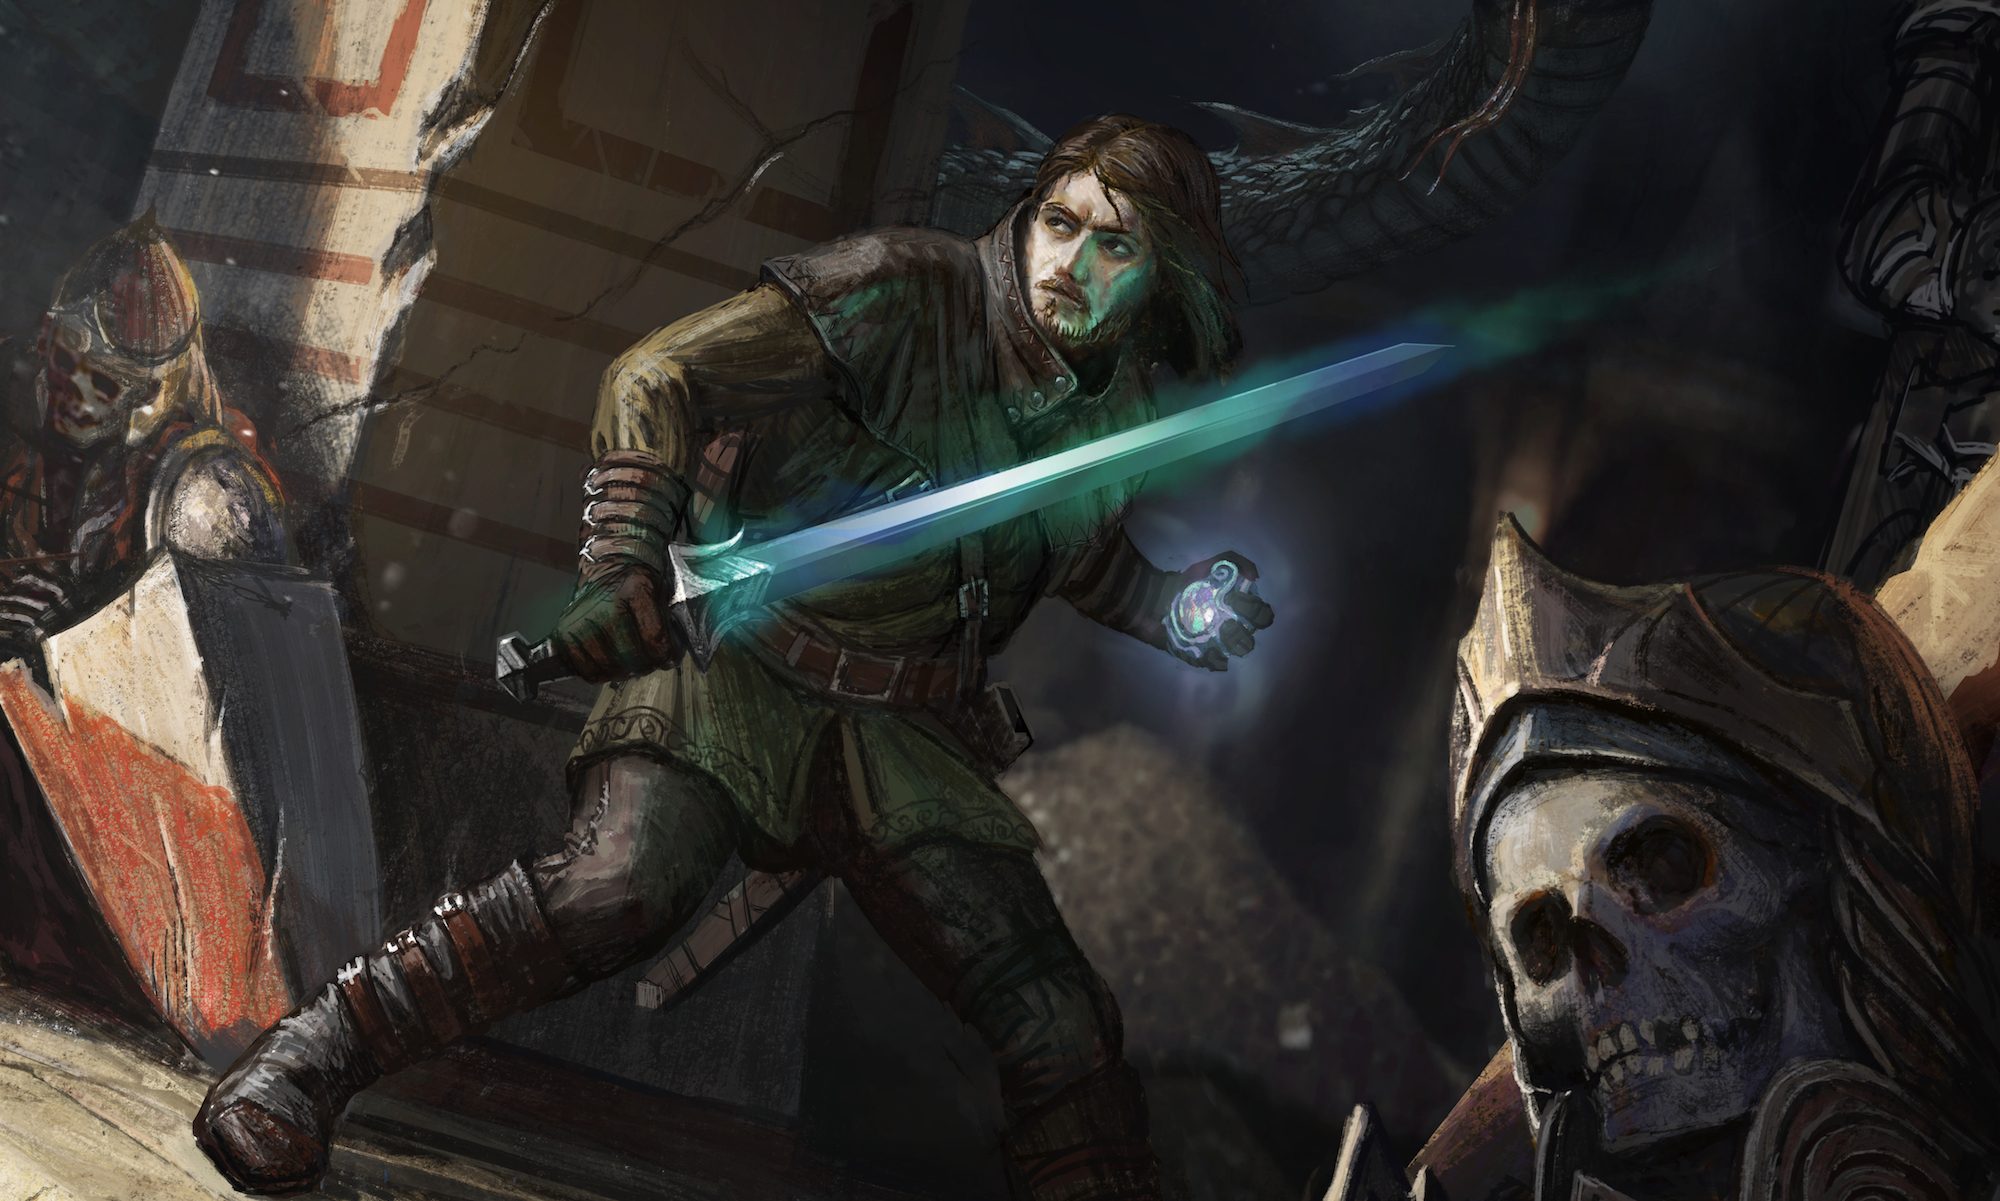
Thinking back to the predicament we left Sabrien Reed in at the end of our previous post, face-to-face with two Hyvryx Scouts thanks to the Seek and Destroy Encounter, let’s assume it’s the start of the turn and see how this plays out.
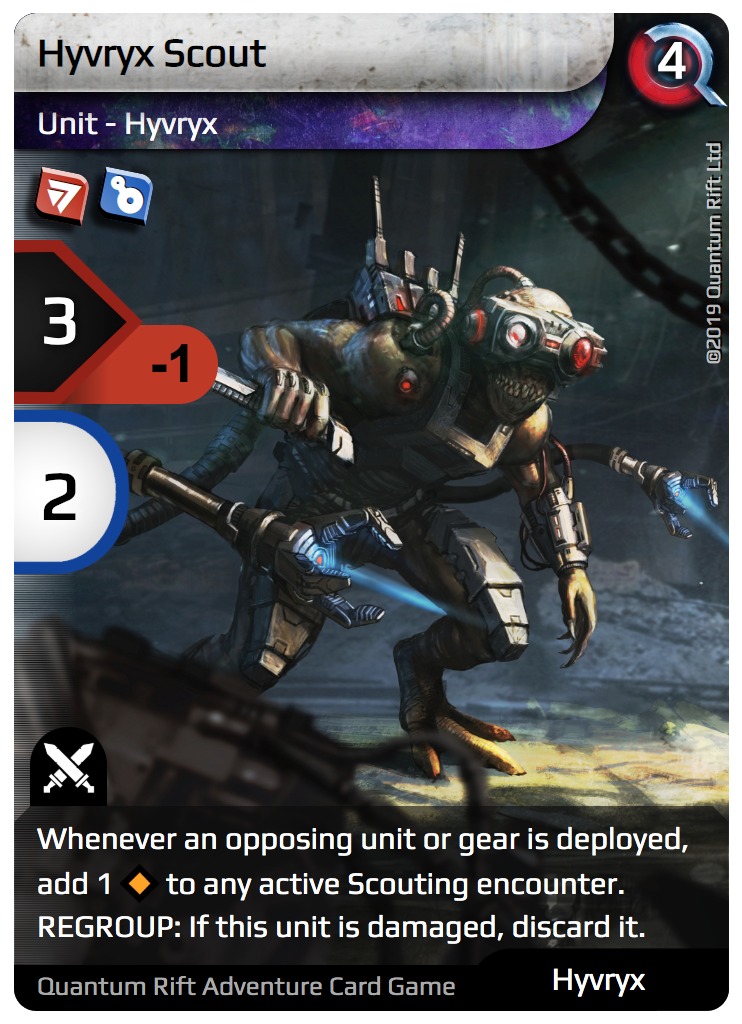
Deployment Phase – Although we might have some gear in hand to deploy, let’s assume we don’t deploy it now because of the first effect on each Hyvryx Scout, which would cause 2 Charge to be added to the Encounter! (“Whenever an opposing unit or gear is deployed, add 1 Charge to any active Scouting encounter”).
Combat Phase – At the start of this phase, all three units are ready and able to attack. Fortunately, for you, the attack order is decided by the player! Assuming Sabrien attacks first, the following outcomes are possible:
Sabrien is exhausted (from attacking), one Scout is damaged (from Sabrien achieving more Hits than its Defence), one Scout is still ready.
Sabrien is exhausted (from attacking), one Scout is exhausted (from Sabrien only managing Hits equal to its Defence), one Scout is still ready.
Sabrien is exhausted (from attacking), one Scout is ready (from Sabrien getting fewer Hits than its Defence), one Scout is still ready.
Given that Sabrien gets to roll 3 Attack dice with a +1 roll bonus and 1 guaranteed Hit, the last outcome seems very unlikely, especially with the chance to Rift. In fact, the chance to Rift on each roll and 4+ being considered an Attack success means you can virtually guarantee you will damage one of the Scouts, so let’s assume the first outcome is what happened. Great! For reasons that will become clear in a future post that covers the Combat Phase in more detail, let’s assume the remaining Scout does not attack Sabrien.
Explore Phase – Ordinarily, you might be able to do something interesting here (which you will see in the next post), but we must skip this phase if there is an active Encounter, so onto the next phase …
Threat Phase – We must trigger the THREAT effect of the Encounter, which puts 2 additional Charge on it.
Regroup Phase – We now trigger the REGROUP effect on the damaged Scout to discard it, leaving just the one ready Scout.
We’ve now reached the next turn, which we might expect would play out similarly to this one, with all units starting out ready again and Sabrien attacking, but something special happens after Sabrien damages the remaining Scout: there are no longer any ready Hyvryx units in play to satisfy the Encounter’s DURATION, so the Encounter ends immediately!
Hurrah! Sabrien has survived his first encounter on Andares. Not only that, he is about to get his first chance to explore this mysterious world, far away from his home, in both space and time! Be sure to join us next time when we will get to explore what happens next together.
When designing a character-based card game primarily for solo/co-op play, there’s an important challenge to solve in how opposing forces will be controlled. In today’s post, we will be exploring some of the mechanics we’ve chosen to use as part of our solution.
But, before we that, I’d like to briefly describe why we rejected the most obvious approach of creating a symmetrical game you play against a non-human “player”, with its own deck of cards and hand and turns to take actions, all controlled by some rules/heuristics or other form of Artificial Intelligence.
While this tends to be the default for the single-player Campaign/Adventure modes of digital trading cards games like Hearthstone and Shadow Era that are designed first and foremost to be played against other people, a physical (tabletop) game with only one human player requires all opposing card behaviours to be determined and enacted by proxy by that player. Having experimented with this originally, it did not take long to conclude the “work” involved in this for the player, compared to making their own choices and plays, can really dampen the fun factor.
So with the idea of a symmetrical game out the window, we considered the fairly standard approach used by traditionally solo/co-op games of building the behaviour of the enemy cards into the player’s turn through distinct turn phases, triggered effects and special cards. Let’s take a look at one of those special cards now!
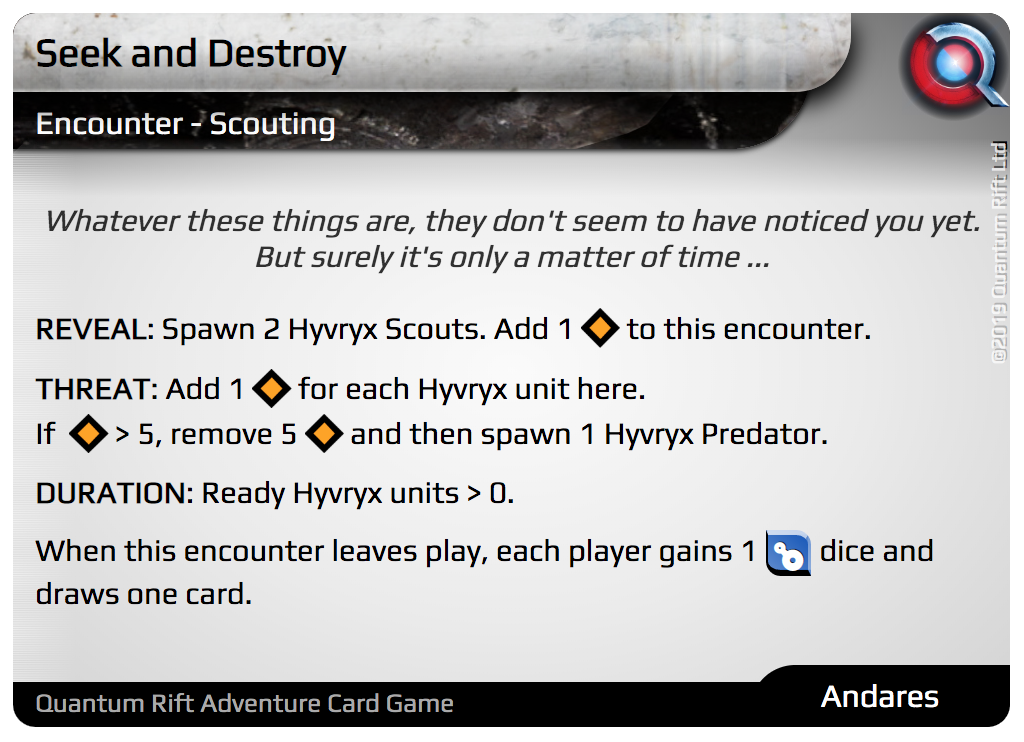
The first thing to notice is that this card is in landscape format and has no Quanta symbols and no Rift number. This is because it’s not a playable card that a player will ever have in their deck or hand, but a story card that embodies part of the particular adventure being played. The specifics of how an Encounter enters play will be detailed in a future post, but for now let’s assume that this one has been revealed at the start of a game after you have chosen Sabrien Reed as your hero, with The Shy Sword starting in play with him.
With that in mind, the next logical step is then surely to discuss the REVEAL effect, which triggers when this Encounter is revealed for the first time. Within seconds of Sabrien arriving in a distant time and place, with only his sword for company, he will be joined by two Hyvryx Scouts across from him (spawned from an Enemy Pile that was constructed as part of the game setup).
But that’s not all that happens! We also must add 1 Charge to the card, that will represent a growing threat to Sabrien while this Encounter persists. (A stack of counters/tokens or dice work well to track the current Charge.)
Speaking of a growing threat, let’s look at that next. The THREAT effect, which was first introduced on the Hyvryx Predator, is another that triggers at a specific time in the game, but this one actually happens on every turn during the player’s Threat Phase. Looking over the simple logic above, hopefully you can see that if the Hyvryx Scouts are left unchecked to continue their scouting then the aforementioned Hyvryx Predator will soon come join the fray. For Sabrien’s sake, we must determine how to bring this Encounter to an end as soon as possible! But how?
Thankfully, we must look no further than the next line down, where the DURATION specifier for the Encounter is written. Unlike REVEAL and THREAT, this is not an effect but an ongoing condition that says the Encounter will only remain in play while there is at least one “ready” Hyvryx unit. Sabrien is therefore going to need to find a way to make them all not ready somehow, or remove them from play completely, to end this Encounter before the Hyvryx insist on having him for dinner. Food for thought, I think you’ll agree!
With such high stakes (or should that be thigh steaks?), I think this is a good place to end for today, to give you some time to digest what we’ve covered and ensure the Hyvryx don’t get to digest what they’ve discovered … for now, at least.
When we return next time, we will look into the different states units can be in and the ordering of phases in a turn, which should hopefully bring forth some ideas as to how Sabrien might escape this Encounter. See you then!
Welcome back to our blog, where we are steadily revealing more details about the adventure card game we are developing, set in our brand new Quantum Rift Universe.
Now that we’ve introduced the concept of Quanta, through the Quanta symbols on cards and the coloured Quanta dice (see the image below for a reminder), our goal today is to explore the meaning behind these different symbols and colours.
Just as everything in our universe can be viewed as energy in different forms, according to Einstein’s famous equation (E = mc2), everything in the Quantum Rift Universe is considered to be Quanta energy, which we classify into four main coloured types according to its different forms and applications:
Red represents the physical embodiment of Quanta within living creatures, chosen both for the colour of blood that pumps around the body and for the blood that can be spilled through acts of physical dominance! Consequently, within our card game, you can expect to see at least one red Quanta symbol on strong/athletic characters and those proficient in combat.
Yellow represents mental prowess within sentient beings, chosen for its associations with clarity and wisdom. Characters within our game with at least one yellow Quanta symbol can therefore be considered to have above average intelligence, intellect and mental acuity.
Green represents nature and the concepts of life and growth, chosen for obvious reasons! As such, all characters in our game that you would expect to survive (and potentially thrive) in the wilderness have at least one green Quanta symbol on their cards.
Blue represents technology and engineering (as opposed to natural development/evolution), chosen mostly because it was the only remaining primary colour! When a character in our game is particularly talented with technology or endowed with it, their card will have at least one blue Quanta symbol to show this.
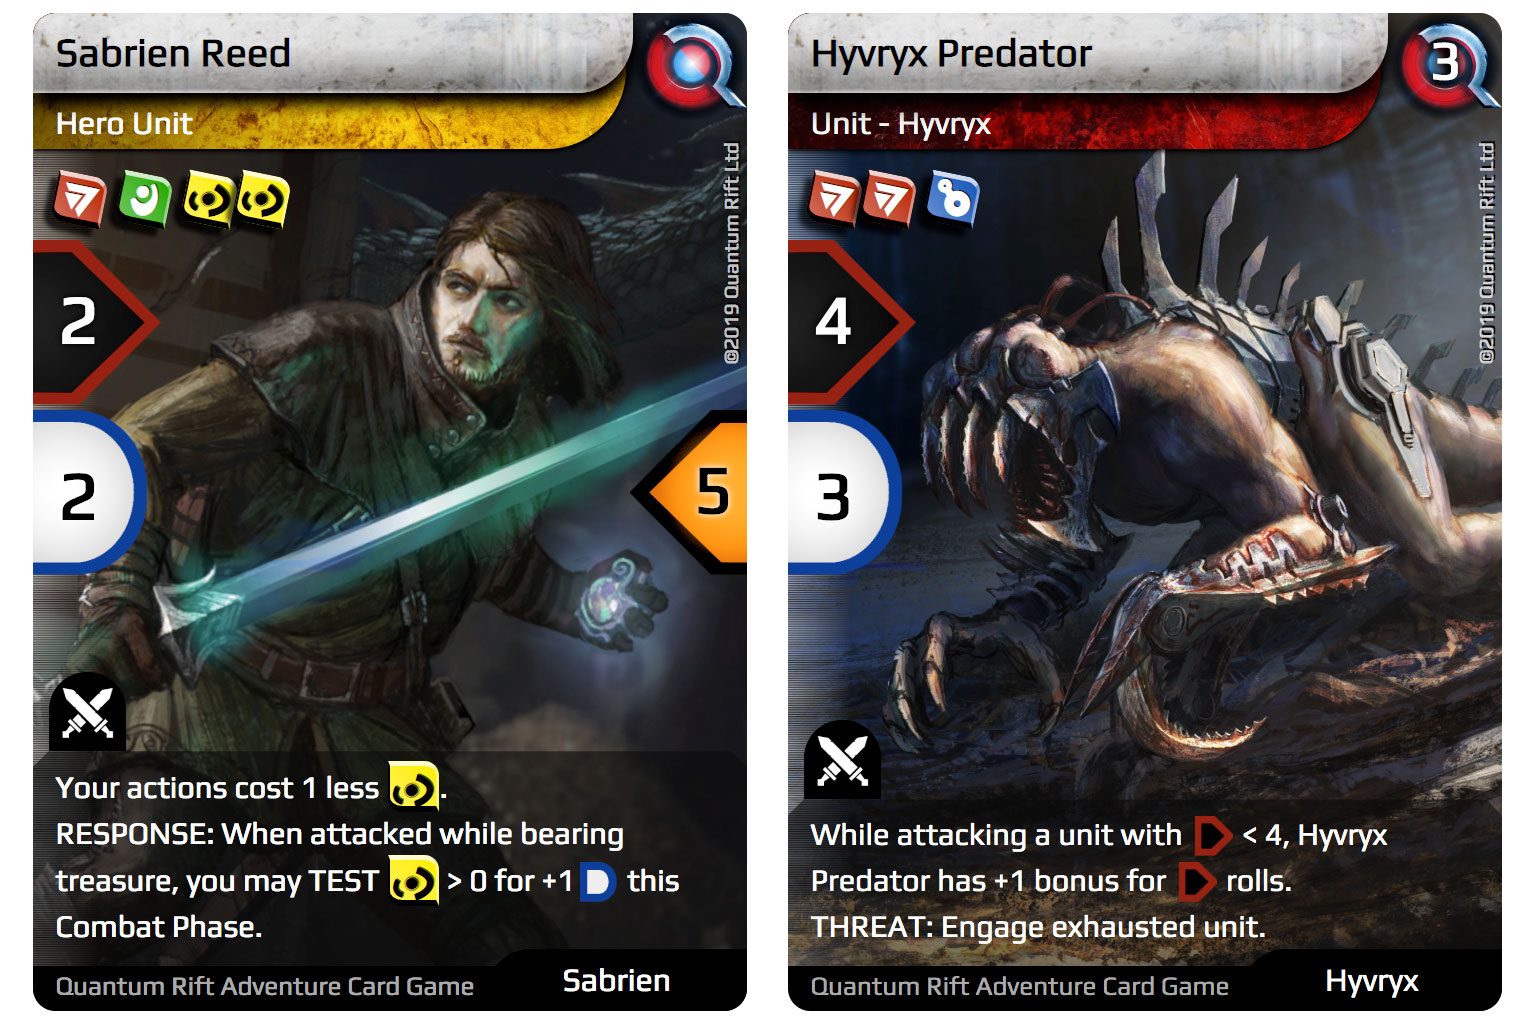
Taking all this into account, what could we deduce about Sabrien Reed and the Hyvryx Predator revealed previously?
If you’ve concluded that Sabrien is likely an accomplished explorer and treasure-hunter from medieval times, armed with a sharp mind and abundance of worldly wisdom (from his world and time at least), you’ve hit the nail right on the head – which is pretty much Sabrien’s limit when it comes to technology!
On the other hand, or any hand in fact, the only thing we can conclude for now about the bioengineered Hyvryx Predator is that it is likely to lead to plenty of blood loss.
So one question remains for today: Will Sabrien’s weakness with technology be his undoing when he encounters the Hyvryx faction on his next adventure?
If this has you intrigued, be sure to tune in next time, when we reveal another Hyvryx unit and a new card type: Encounter.
Welcome back to the Quantum Rift Blog! If you missed our posts on Anatomy of a Card (Part 1 and Part 2), please read those before continuing, as we are building on the details shared there.
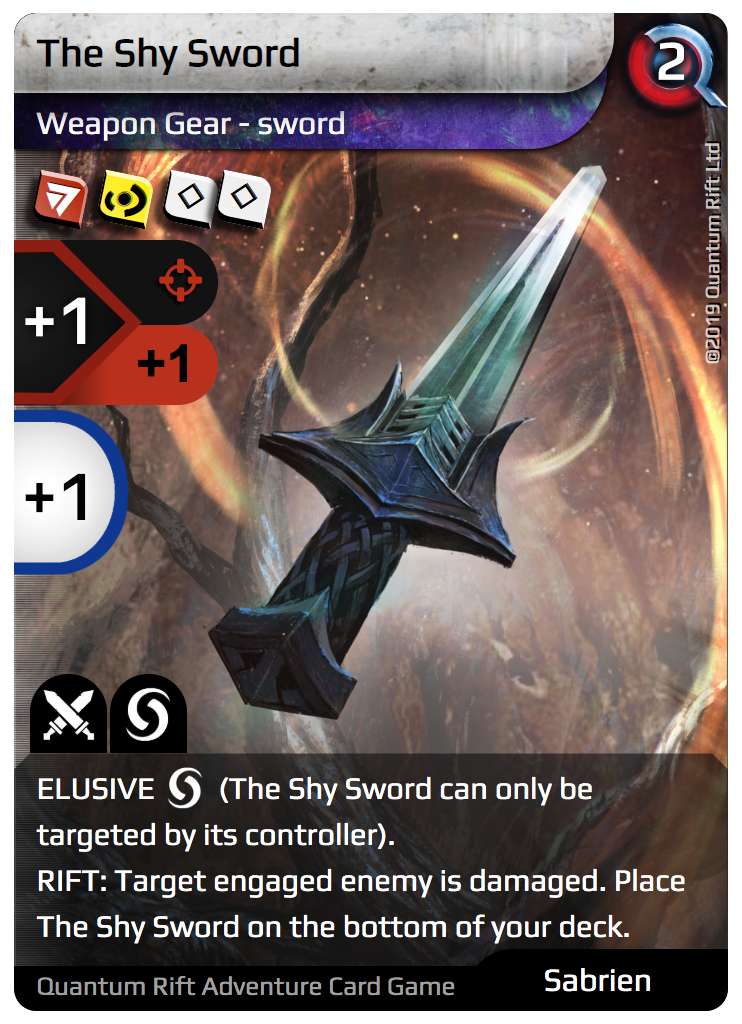
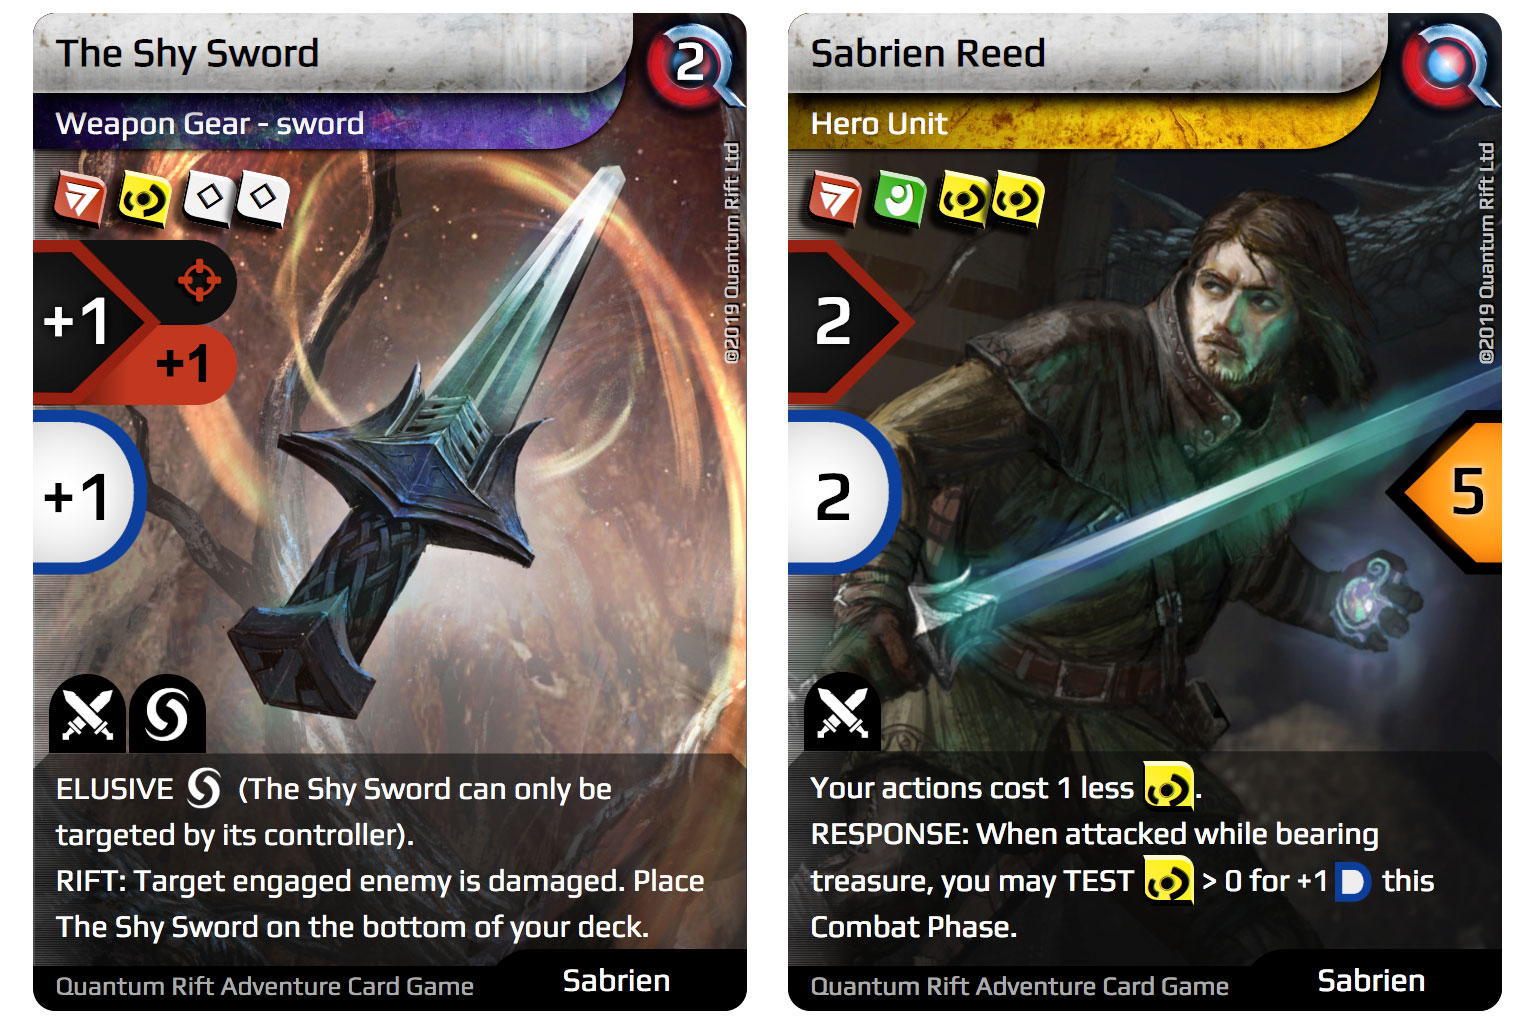
In today’s post, we will reveal further connections between the cards and dice in our game, and another innovation that brings additional skill, creativity and excitement to the connection shared last time: the option to Rift with a card in hand to boost any of your dice rolls. As with previous posts, we will do this with the aid of a new card, The Shy Sword, which is in Sabrien’s card pool and starts in your deck in your first adventure.
Let’s start with the Quanta symbols on The Shy Sword. Here we have 1 Red, 1 Yellow and 2 White (which means “any colour”). These represent the cost to deploy this weapon, but how will it be paid? Using your Quanta dice!
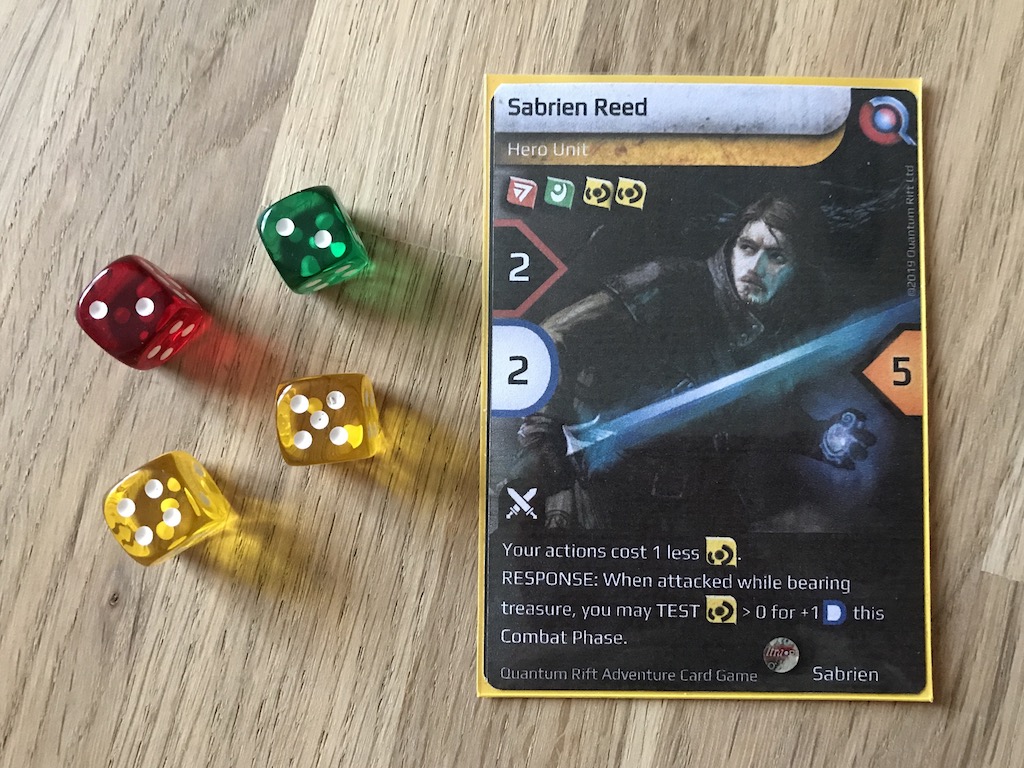
While some games used resources or mana as the “currency” for players to spend each turn, the Quantum Rift Adventure Card Game uses Quanta dice. At the beginning of the game, you receive dice matching those shown on your chosen Hero, which means 1 Red, 1 Green and 2 Yellow for Sabrien Reed.
When you have The Shy Sword in your hand and wish to deploy it, you will exhaust these four Quanta dice, using 1 Yellow and 1 Red and then the other Yellow and 1 Green to match the 2 White.
If you’re wondering why we use dice rather than simple tokens or counters, the short answer is that you can roll dice! One of the main reasons you might roll your Quanta dice is to perform a Quanta test, like the one in Sabrien’s game text which requires you to roll one or more ready (not exhausted) Yellow Quanta dice and get at least one success (a roll of 4 or more at default difficulty setting) to receive the +1 Defence.
Speaking of which, let’s return to the Rift action you can do on any of your dice rolls. In the previous post we revealed this means to add the Rift Number of a card in hand to your dice roll and then discard that card, but there is also the option to apply a Rift effect at the same time. Casting our eyes back to The Shy Sword, we can see one of its abilities is preceded by “RIFT:” which shows this is a Rift effect. Providing you have just rolled one of your dice – whether that be for an Attack, a Quanta test or some other reason – you can Rift with The Shy Sword to benefit from its effect for no cost other than discarding it. Rest assured, there are ways to get it back later because it’s a pretty good sword to have in play!
Which brings us nicely onto some bonus information for today. As you can see, the Attack value for The Shy Sword is +1, but it also has a Hit Icon (meaning 1 guaranteed Attack success) and an Attack Roll Bonus of +1 (meaning rolls of 3 or above are considered as Attack successes).
When Sabrien is equipped with The Shy Sword, you will now be able to roll 3 Attack dice and have a decent chance of getting 4 Attack successes in total (when the Hit Icon, the Attack Roll Bonus and option to Rift on any failures is taken into account).
You’ll also notice The Shy Sword boosts Sabrien’s Defence to 3, which can be further increased via his Response effect if you perform a successful Quanta test mentioned earlier.
We hope you’ve enjoyed hearing more about how the cards and dice in our adventure card game are connected and you are looking forward to playing. In our next post, we will reveal more about the meaning of Quanta, which goes much deeper than their colours. See you then!
Welcome back to our blog! Following on from Part 1, in this post we will talk about some other components of the cards in the Quantum Rift Adventure Card Game and discuss why we have positively embraced the use of dice in our game when the prevailing view seems to be that the output randomness they can bring increases the luck factor too much.
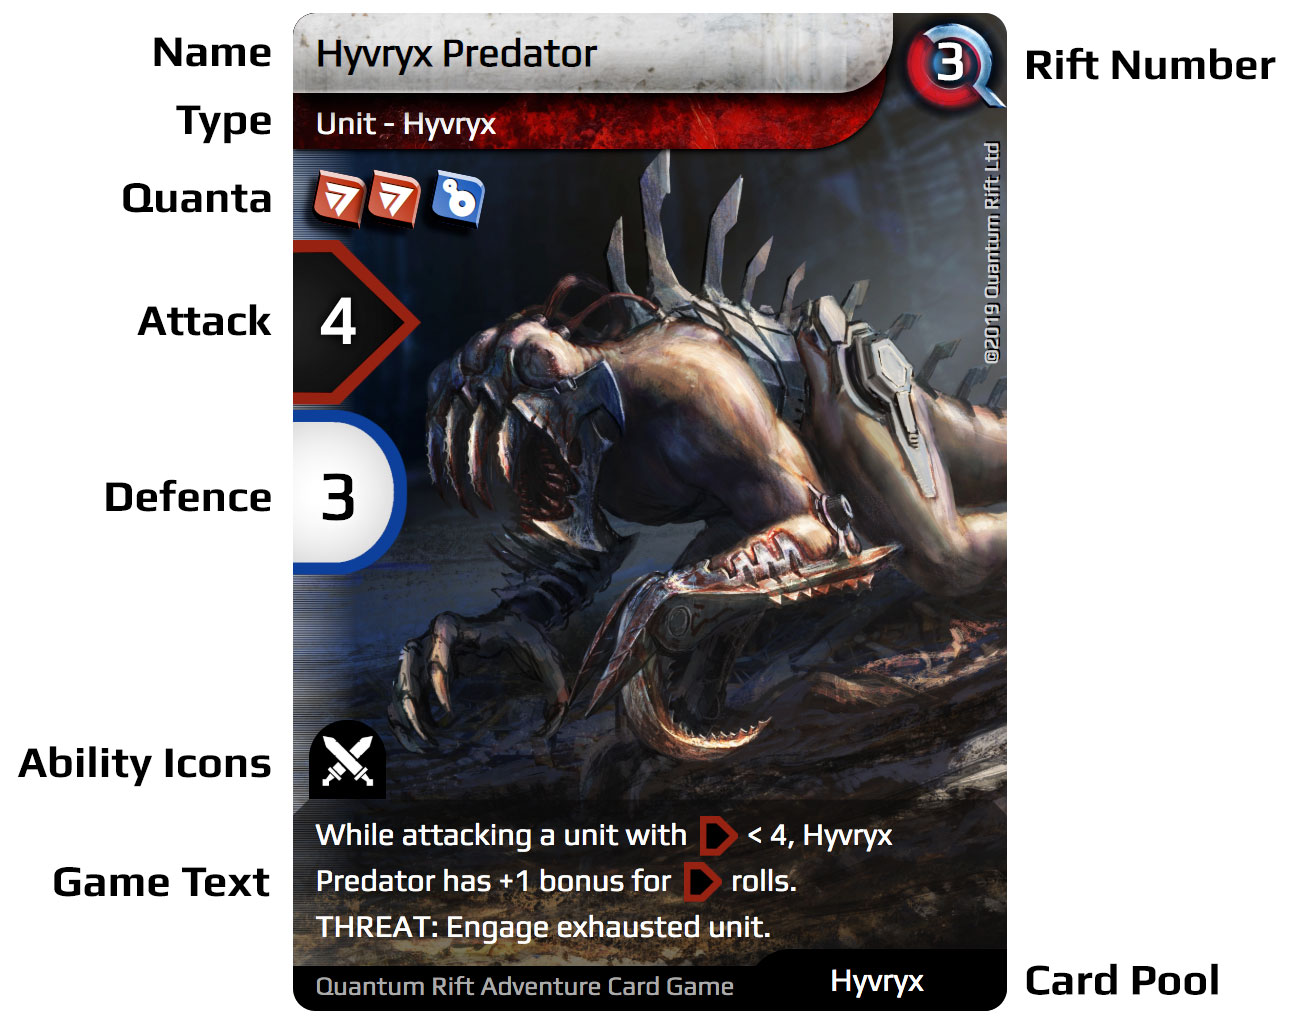
Without further ado, let’s check out the Hyvryx Predator again, but this time with some annotations about what its icons, numbers and words mean.
Today’s first component up for discussion is the Type, which we skipped right over in Part 1. Whereas Sabrien Reed is a “Hero Unit”, this card is a “Unit – Hyvryx”.
The main implications of this difference are: as a Hero Unit, Sabrien Reed will already be in play at the start of the game and he has Vitality, which roughly represents the number of times he can become damaged during his adventure; as a basic Unit, Hyvryx Predator will enter play during the game and has no Vitality, so it will be destroyed if it is already damaged when it should become damaged (e.g. after being defeated in combat).
Although we already covered it in Part 1, it’s worth returning to the Game Text at this point. It should come as no surprise that Sabrien and the Hyvryx Predator have different effects in their Game Text to build on top of (or override) the basic rules of the game. While we can’t delve into the second effect today, it is worth looking at the first ongoing effect that conditionally gives a bonus on your Attack rolls for the Hyvryx Predator: whenever that +1 bonus applies, an Attack roll of 3 will also be considered a success (at default difficulty setting).
This leads nicely onto what we consider to be one of the key innovations in the Quantum Rift Adventure System: the Rift Number! Whilst dice can bring many positives to a game (variety, surprise, excitement, the simple joy of rolling them, etc.), the impact of using them to determine critical outcomes can sometimes work against the strategic element and limit the influence of your decisions as a player; this can then lead to loss of engagement and a feeling, at times, like too many things are outside your control and purely at the mercy of luck instead. To address this potential issue, while maintaining the benefits of using dice in the first place, we have engineered a synergistic connection between our cards and dice in the form of the Rift mechanic!
So what exactly is the Rift mechanic? Well, that would have been the subject of a future post but we anticipated it would not work out well for us to keep stringing you along, so we decided to make a change aiming for a better outcome. Coincidentally, this is also what it means to Rift in our game, where you can take advantage of a god-like power to witness what would have happened and then choose whether to make some change with a more preferable outcome in mind. More specifically, in terms of gameplay, this is implemented by offering the player a choice to improve any dice roll by discarding a card from hand to add its Rift Number to that roll. (Yes, fate really is in your hands, twice over, in the dice you roll and the cards you might Rift with!) Aside from being able to boost your dice rolls, there is one other major benefit of the Rift mechanic, but that is being saved until our next blog post … no matter how many cards you discard to try to change our minds!
The final component we wish to cover today is the Card Pool. Within the Quantum Rift Adventure System, each card is assigned to a card pool, which determines whether and where it might appear in a particular adventure. In the case of our first adventure, the Sabrien pool provides cards that are controlled by the player, to aid Sabrien Reed on his adventure, while the Hyvryx pool provides cards controlled according to the game rules, representing enemy forces encountered on the way. As you might expect, each of our four Heroes has their own card pool, highlighting their strengths and background, but there are also Basic and Universal pools featuring cards that can appear regardless of the Hero or the specific adventure.
Speaking of adventures, I’m afraid we have reached a junction in ours for today. Where you go next is entirely up to you, but we hope you will return in the near future to continue learning about our adventure card game and the wider Quantum Rift Universe. See you soon!
Hot on the heels of the card reveals, we can now start breaking down each card into its component parts. Let’s start with Sabrien Reed, one of the four Heroes that will appear in the first adventure created with the Quantum Rift Adventure System (QRAS).
Since this is a developer blog, as opposed to a rulebook, we’ll skip over some parts and focus on what should hopefully be the most interesting to hear about!
Let’s start with Quanta! Every playable card in the QRAS has one or more Quanta symbols shown under its Type. In Sabrien’s case, you can see he has 1 Red, 1 Green and 2 Yellow. What each colour means is actually beyond the scope of this post, but we can confirm that the group of Quanta symbols shown under the Type almost always represent the cost that must be paid to play the card. (If you’re wondering how you might pay this cost, I’m afraid that’s also the subject of a future post!)
Next up, we have Attack and Defence, which are used during the Combat Phase to determine which of the characters involved should become damaged or destroyed. Unlike some other games you might be familiar with, this goes beyond simple comparison of values and involves rolling some dice! Specifically, you will roll a number of six-sided dice equal to the Attack value, aiming to have more successes than the defender’s Defence value. (At the default difficulty setting, rolling 1-3 is considered a failure and 4-6 means a success.)
The final part of Sabrien’s card we wish to talk about today is the Game Text. As you can see, he has an ongoing effect that references a Quanta symbol for reducing the cost of some Action cards when you play them and another effect that can boost Sabrien’s Defence value if you can get at least one success when performing a Quanta Test. Again, it’s a bit early to go into full details of what this means, but you can rest assured there will be dice involved!
Hopefully our reluctance to go into lots of details has not been too frustrating for today, and your curiosity to find out more will bring you back in the near future. Whether you are a fan of dice in your card games or not, you will definitely want to read our next post, which will cover the innovative ways we have integrated dice into our card game to maximise excitement without compromising strategy and skill.
Although we are still in the early stages of development of our new adventure card game, we have arrived at the point we can share a couple of cards.
Over the coming weeks, we will reveal the meaning of specific parts of each card, so stay tuned if we have (as planned) piqued your curiosity! Until next time …